SVN to GitLab How-To
- 1. Import Subversion repository
- 1.1 Download SubGit
- 1.2 Create Git repository
- 1.3 Start importing
- 2. Mirror Subversion repository
- 2.1 Download SubGit
- 2.2 Create Git repository
- 2.3 Configure Git repository
- 2.4 Adjust general configuration, authentication configuration, and authors mapping
- 2.5 Start synchronization
1. Import Subversion repository
In this chapter the one-time import process is described. As result of the import a Git repository will be created from an SVN repository specified but it won’t be kept in sync the SVN repository.
1.1 Download SubGit
As the first step one should get the latest version of SubGit from download page and unpack it. For more details and platform-specific installation information refer to SubGit book.
1.2 Create Git repository
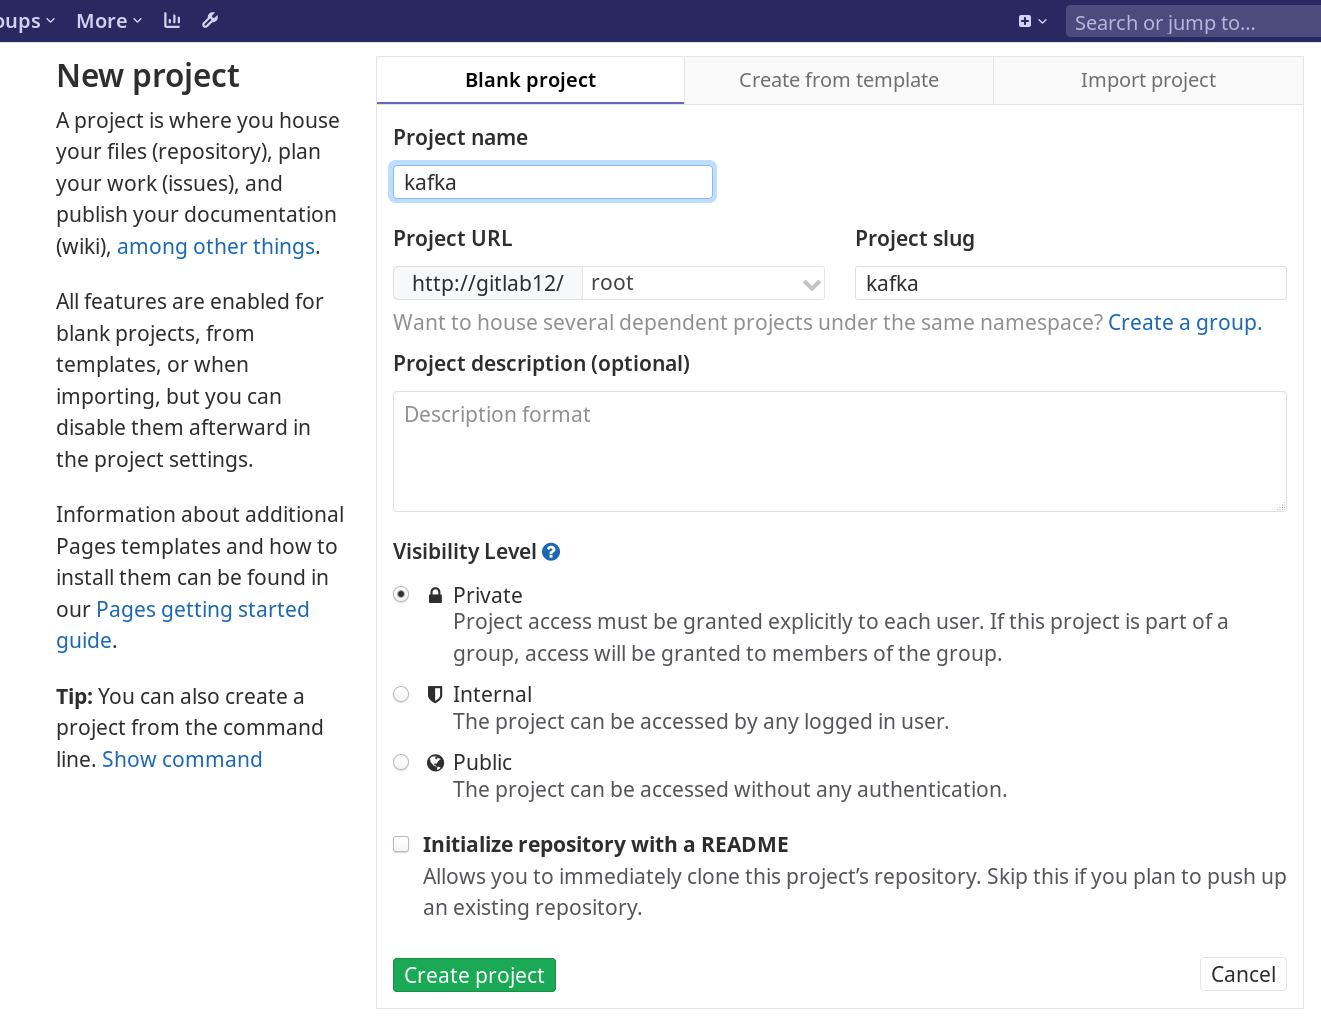
To import an SVN repository to a Git repository served by GitLab you need to create new Git repository (new project in GitLab therminology) first. Click New project button displayed as ‘+’.

Give a name to your project, DO NOT check “Initialize repository with a README” checkbox, and click Create project button.

1.3 Start importing
To run SubGit you have to find the Git repository path on the hard drive. To do that find a directory on the server with GitLab where Git repositories are stored. Usually this directory is
/var/opt/gitlab/git-data/repositories/
Depending on version, GitLab uses one several storage types. Legacy storage (default for GitLab < 10.0) type uses
#{namespace}/#{project_name}.git
naming scheme.
Since version 10.0 GitLab uses hashed storage with the following structure:
"@hashed/#{hash[0..1]}/#{hash[2..3]}/#{hash}.git"
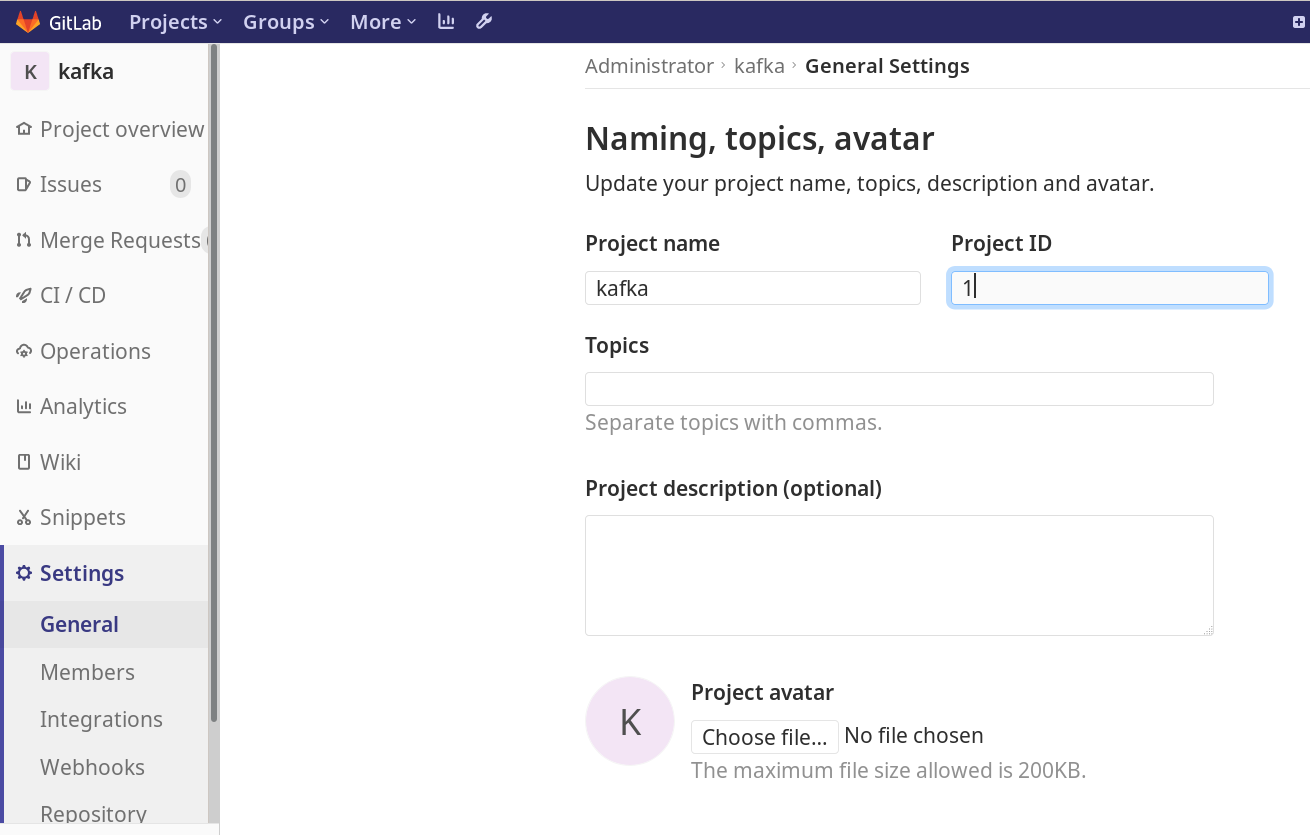
This hash is SHA-256 of the project ID. To find the project ID to to Setting > General:

For example, in our case the project ID is “1”. So to find a hash of it run:
$ echo -n 1 | sha256sum
6b86b273ff34fce19d6b804eff5a3f5747ada4eaa22f1d49c01e52ddb7875b4b
Hence for our example the repository path is
/var/opt/gitlab/git-data/repositories/@hashed/6b/86/6b86b273ff34fce19d6b804eff5a3f5747ada4eaa22f1d49c01e52ddb7875b4b.git
If we were using Legacy Storage, the path for the example repository path would be:
/var/opt/gitlab/git-data/repositories/username/kafka.git
where username is name of the user in GitLab (“root” for our example).
Usually this directory has git:git permissions. So it’s better to change current user to git:
$ sudo su git
$ id
uid=999(git) gid=999(git) groups=999(git)
Enter that directory (in this example we assume the current user is root):
$ cd /var/opt/gitlab/git-data/repositories
$ pwd
/var/opt/gitlab/git-data/repositories
$ ls
+gitaly  @hashed
$ cd @hashed/6b/86
Start importing
$ subgit import https://svn.apache.org/repos/asf/kafka 6b86b273ff34fce19d6b804eff5a3f5747ada4eaa22f1d49c01e52ddb7875b4b.git
...

IMPORT SUCCESSFUL
2. Mirror Subversion repository
In this chapter the SVN repository mirroring feature is described. Any change performed to the Git repository will be automatically translated to the SVN repository and vice versa.
2.1 Download SubGit
As the first step one should get the latest version of SubGit from download page and unpack it. For more details and platform-specific installation information refer to SubGit book.
2.2 Create Git repository
To mirror an SVN repository to a Git repository served by GitLab you need to create new Git repository (new project in GitLab therminology) first. Click New project button displayed as ‘+’.

Give a name to your project, DO NOT check “Initialize repository with a README” checkbox, and click Create project button.

2.3 Configure Git repository
To run SubGit you have to find the Git repository path on the hard drive. To do that find a directory on the server with GitLab where Git repositories are stored. Usually this directory is
/var/opt/gitlab/git-data/repositories/
Depending on version, GitLab uses one several storage types. Legacy storage (default for GitLab < 10.0) type uses
#{namespace}/#{project_name}.git
naming scheme.
Since version 10.0 GitLab uses hashed storage with the following structure:
"@hashed/#{hash[0..1]}/#{hash[2..3]}/#{hash}.git"
This hash is SHA-256 of the project ID. To find the project ID to to Setting > General:

For example, in our case the project ID is “1”. So to find a hash of it run:
$ echo -n 1 | sha256sum
6b86b273ff34fce19d6b804eff5a3f5747ada4eaa22f1d49c01e52ddb7875b4b
Hence for our example the repository path is
/var/opt/gitlab/git-data/repositories/@hashed/6b/86/6b86b273ff34fce19d6b804eff5a3f5747ada4eaa22f1d49c01e52ddb7875b4b.git
If we were using Legacy Storage, the path for the example repository path would be:
/var/opt/gitlab/git-data/repositories/username/kafka.git
where username is name of the user in GitLab (“root” for our example).
Usually this directory has git:git permissions. So it’s better to change current user to git:
$ sudo su git
$ id
uid=999(git) gid=999(git) groups=999(git)
Enter that directory (in this example we assume the current user is root):
$ cd /var/opt/gitlab/git-data/repositories
$ pwd
/var/opt/gitlab/git-data/repositories
$ ls
+gitaly  @hashed
$ cd @hashed/6b/86
Configure
$ subgit configure https://svn.apache.org/repos/asf/kafka 6b86b273ff34fce19d6b804eff5a3f5747ada4eaa22f1d49c01e52ddb7875b4b.git
...
Git repository is served by GitLab, hooks will be installed into 'custom_hooks' directory.

CONFIGURATION SUCCESSFUL
...
Make sure you see the line
Git repository is served by GitLab, hooks will be installed into 'custom_hooks' directory.
This means that SubGit has detected GitLab presence and generated
[hooks]
        directory = custom_hooks
option in subgit/config file of the Git repository. This option means that SubGit will work with custom_hooks directory instead of hooks directory to install/uninstall/upgrade hooks. This is important because hooks directory is reserved by GitLab for its own purposes.
Above mentioned “subgit configure” command expects that the SVN URL has trunk/branches/tags structure.
2.4 Adjust general configuration, authentication configuration, and authors mapping
Edit subgit/passwd to provide credentials for the SVN repository.
$ vi 6b86b273ff34fce19d6b804eff5a3f5747ada4eaa22f1d49c01e52ddb7875b4b.git/subgit/passwd
Edit subgit/authors.txt to provide mapping between SVN authors and Git authors.
$ vi 6b86b273ff34fce19d6b804eff5a3f5747ada4eaa22f1d49c01e52ddb7875b4b.git/subgit/authors.txt
Edit subgit/config according to your needs. See comments in subgit/config files for details.
$ vi 6b86b273ff34fce19d6b804eff5a3f5747ada4eaa22f1d49c01e52ddb7875b4b.git/subgit/config
2.5 Start synchronization
Now everything is ready for starting synchronization of the Git repository with the SVN repository. To start the process run
$ subgit install 6b86b273ff34fce19d6b804eff5a3f5747ada4eaa22f1d49c01e52ddb7875b4b.git
First it will run initial translation of the SVN repository to Git. On the command completion, SubGit will start a daemon that will translate every change in the SVN repository to 6b86b273ff34fce19d6b804eff5a3f5747ada4eaa22f1d49c01e52ddb7875b4b.git repository and vice versa.